Add a DS record
Note: Currently, the ability to add, edit, or delete DS records is unavailable in the HostingDude.com Domain Manager. We ask for your patience until we can update this feature in the next several weeks.
You can work with one or more DS records at one time, depending on your domain name's extension (.com, .net, etc.). Your registry or hosting company will be able to provide you with the information you need to create DS records.
To create a single DS record
- Log in to your HostingDude.com account.
- Next to Domains, click Manage.
- You must be in the list view of your account in order to create DS records. In the upper right corner of your account, choose the list view:
- Click on the domain name you want to create a DS record for.
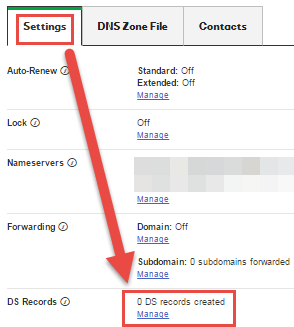
- On the Settings tab, under DS Records, click Manage:

- In the window that appears, click Add DS Record.
- If applicable, enter or select the following, and then click Next:
- Key Tag — An integer value less than 65536 that identifies the DNSSEC record for this domain name.
- Algorithm — The cryptographic algorithm that generates the signature.
- Digest Type — The algorithm type that constructs the digest.
- Max Signature Life (in seconds) — The length of time that the key is valid for.
- Flags — This identifies the key type: a Zone-Signing Key or a Key-Signing Key.
- Protocol — This value identifies the protocol the electronic key match up uses.
- Digest — The digest is an alpha-numeric value.
- Public Key — Registries use this value to encrypt DS records. Decryption requires a matching private key.
- We validate the DS record information you enter by searching the key tag on the DNS server to verify it is DNSSEC-enabled.
- If we find an error, you have the following options:
- To Override the Error and Confirm the Entries — Select I understand that that continuing with errors..., and then click OK.
Note: Your website might not resolve if you store the invalid DS record information.
- To Correct the Entries Before Continuing — Click Previous to return to the entry screen and correct the entries.
- To Exit Without Saving the Entries — Click Cancel, and then click OK.
- To Override the Error and Confirm the Entries — Select I understand that that continuing with errors..., and then click OK.
- If we do not find errors, click Next, and then click OK.
- If we find an error, you have the following options:

To create multiple DS records
You can create a maximum of 13 DS records at a time.
NOTE: This process is not available for .eu domain names. For .eu domain names, you can store a maximum of four DS records, and you must use basic mode to enter them.
To Create Multiple DS records
- In the List View of your account, click on the domain name you want to create multiple DS records for.
- On the Settings tab, under DS Records, click Manage.
- In the window that appears, click Add DS Record.
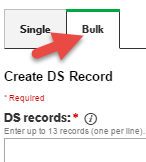
- Select the Bulk tab on the next window:
- Enter or copy/paste the following information for up to 10 DS records (in BIND zone file format), and then click Next. Enter one DS record per line. Separate record fields with a space. For example:
- Indicate how to apply the records you entered:
- Replace all existing DS records — This option replaces all existing DS records for the domain name with the current entries.
- Append to existing DS records — This option appends the current entries to previously-saved DS records for the domain name.
Note: Domain names can have a maximum of 13 DS records each with the exception of .eu domain names, which can have a maximum of four records each.
- We validate the DS record information you enter by searching the key tag on the DNS server to verify that it is DNSSEC-enabled.
- If we find an error, you have the following options:
- To Override the Error and Confirm the Entries — Select I understand that that continuing with errors..., and then click OK.
Note: Your Web page might not resolve if you store the invalid DS record information.
- To Correct the Entries Before Continuing — Click Previous to return to the entry screen and correct the entries.
- To Exit Without Saving the Entries — Click Cancel, and then click OK.
- To Override the Error and Confirm the Entries — Select I understand that that continuing with errors..., and then click OK.
- If we do not find errors, click Next, and then click OK.
- If we find an error, you have the following options:

coolexample.us 3600 IN DS 20160 7 1 A342AAD056A8EA55E9F4F05B33A7333EE9CB1985