First steps
Website Builder comes with site-building tools that don't require technical skills or coding experience. You can choose from hundreds of themes with placeholder content and images to get started quickly.
- Log in to your HostingDude.com account.
- Click Website Builder/InstantPage to see your website accounts.
- Next to the account you want to use, click Manage.
- Select a domain from your account, enter a domain name registered elsewhere, or create a sub-domain using a domain in your account for your website, and then click OK.
Note: If your account was auto-setup, you can skip this step.
- Locate the theme you want to use for your website, and then click Select Theme. (If you hover your pointer over the thumbnail image
and click Full Screen, you can get a better look at the theme's design.)
Note: Each theme has pluses and minuses, and it may take a couple of days before you know if it fits your needs. While you can change your theme at any time, none of the text and images you've added will be preserved. To avoid starting from scratch if you switch themes, you may want to "test drive" a theme with a minimum of your own text and images until you're sure about it.
- On the Get Established page, enter your business name and contact email address. Optionally, you can add other information that will help us get your business found by your customers:
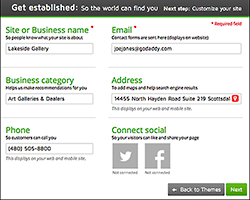
- Business category: Select the category that best describes your kind of business.
- Address: This makes it easy to generate a map of your location and help your listing appear in location-driven search results.
- Phone: You can enter your current business phone number.
- Connect social: You can also connect your Facebook and/or Twitter account to your website.
- When you're finished, click Next.
- If this is your first time setting up Website Builder v7, we show you a quick video overview of its tools. When you're ready, click Close Video to get started building your site. (Your work is automatically saved as you go.)
- When you're ready, click Publish to present your site to the outside world.
Next step
- For a linked list of Website Builder's most commonly used tasks, see Using Website Builder.